

Backyard Tiki Bar Designs to Turn Your Yard Into a Getaway
You picture tiki torches, a thatched roof, and friends gathered around with cold drinks in hand — but turning that daydream into an actual backyard tiki bar feels like it requires a contractor, a permit, and a summer you don't have. It doesn't. Whether you're hosting weekend game days, upgrading the first house you just bought, or chasing that Shark Tank-famous build you saw online, there's a size and style that fits your space and budget. Here are 9 ways to get the island escape without the island-sized hassle.
1. Know What Counts as a Backyard Tiki Bar Before You Shop
Decor Kit vs. Permanent Structure
Before you spend a dime, get clear on what the category actually means. A real tiki bar has a covered roof, a bar-height counter you can actually serve food and drinks off, stools for your guests, and some version of a tropical or rustic aesthetic — thatch, bamboo, dark wood, whatever fits your yard. It's not just a theme. It's a functional outdoor room. Anything missing one of those pieces is decoration, not a bar.
Here's where a lot of homeowners get tripped up: the bamboo-panel kits and tiki signs sold at big box stores look the part in photos but won't survive a real season outdoors. They're thin, they fade, and they aren't built to hold a countertop's worth of weight, let alone withstand wind. A decor kit dresses up a space. It doesn't become one. That distinction matters a lot once you're the one footing the bill twice.
A permanent structure, by contrast, is engineered to carry real use — people leaning on it, drinks spilling, sun and rain hitting it year after year. That's the version worth comparing against everything else on this list, because it's the only one that still looks good three summers from now.
Why Wood and Steel Win Long-Term
A factory-built wooden bar with a galvanized corrugated steel roof gives you the tiki-bar look without the maintenance headache that comes with flimsier builds. Grade #1 pressure-treated lumber resists rot and insects far better than the softwood used in cheap kits, and a steel roof shrugs off hail, heavy rain, and UV in a way bamboo thatch never will. You get the vibe without babysitting the structure every spring.
It also solves a problem most people don't think about until year two: upkeep. Staining, resealing, and checking fasteners are part of owning any outdoor wood structure, and getting ahead of it is easier than catching up — which is why it's worth reading through seasonal backyard upkeep tips before your first winter hits. Skip that step and even a solid structure can start looking tired fast.
Bottom line: durability is what separates a bar from a prop. If it can't handle a wet Saturday night and a cold January, it's not really a backyard tiki bar — it's a backdrop.
2. Pick the Right Size: Small, Medium, Large, or X-Large
Size is where most buyers get stuck. Pick too small and your crowd spills onto the lawn. Pick too big and it swallows the yard. Before comparing styles or finishes, nail down the footprint and the frame first.
Original vs. Deluxe Collection
Every size comes in two builds. The Original series uses standard framing, built for most backyards and budgets. The Deluxe Collection steps up to 6x6 posts and 6-inch roof framing, giving you a sturdier, deck-grade structure that holds up to wind and heavy use without needing a deck contractor to reinforce anything. If you're placing the bar on an existing patio or deck, that upgrade matters more than people expect.
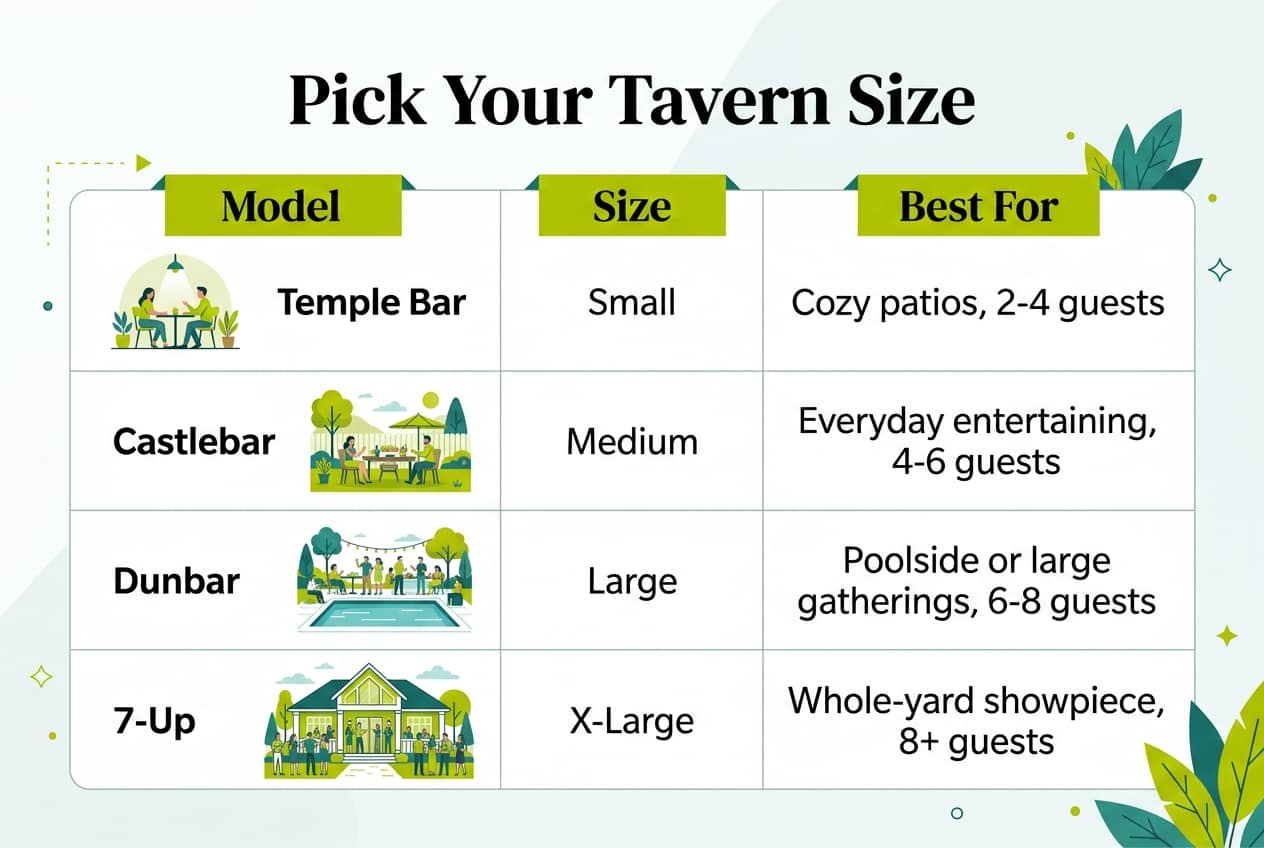
Matching Size to Guest Count
Guest count should drive the decision, not curb appeal. A Temple Bar fits tight patios or side yards where space is at a premium. A Castlebar suits the average backyard hosting 6 to 10 people comfortably. Once you're planning for game-day crowds or poolside entertaining, the Dunbar or 7-Up gives you the counter space and seating a bigger group actually needs — and if you're hosting outdoors for a holiday crowd, it helps to review tips on how to host a fun memorial day party with a custom backyard bar before you finalize layout.
| Size | Best For | Typical Guest Count | Frame Option |
|---|---|---|---|
| Temple Bar | Tight patios, side yards | 2-4 | Original or Deluxe (6x6) |
| Castlebar | Average backyards | 6-10 | Original or Deluxe (6x6) |
| Dunbar | Game-day crowds, larger yards | 10-15 | Original or Deluxe (6x6) |
| 7-Up | Poolside entertaining, big groups | 15+ | Original or Deluxe (6x6) |
Not sure which row fits your yard? Measure your space first, then count your regulars. That's the whole formula.
3. Compare Signature Styles: Dartford, Half Pint, Open Bar, Swingford, Forest Hill
Once you've nailed down size, the signature line is where personality comes in. These five styles aren't just cosmetic tweaks — they change how people actually move around the bar, lean on it, and gather near it. Think of this as the fun part of planning, right after you've figured out how much space you've actually got to work with.
Which Style Fits Which Yard
Each style solves a different layout problem, so it helps to picture your own yard while you read through these. A sloped side yard calls for something different than a wide-open space behind the pool. Match the footprint to how you actually entertain, not just how the bar looks in a photo.
- The Dartford leans into a classic tavern silhouette, with a solid back bar and enclosed feel that suits homeowners who want it to read as a real pub corner, not an add-on.
- The Half Pint trims the footprint down for tight side yards or small patios, proving a compact bar can still anchor a Saturday get-together without eating up the whole lawn.
- The Open Bar drops the enclosed walls for an airy, walk-up design, which makes mingling easier since guests can approach from multiple sides instead of lining up at one counter.
- The Swingford brings a distinct roofline and swing-style detailing that sets it apart visually from the original lineup, good for owners who want something that doesn't look like every other backyard bar.
- The Forest Hill pairs a different finish and roof profile for a slightly more rustic, cabin-like look, which tends to suit wooded or heavily landscaped lots.
- Mixing and matching is common, too — some owners pick a Dartford frame but ask about Forest Hill-style finishing details to split the difference.
Beyond looks, these signature options exist so you're not boxed into the original or Deluxe collection if neither quite fits your plans. Dressing up the final result, whether that's cocktail setups or bar styling, is easier once the structure's personality is locked in — a quick browse through ideas for refreshing cocktails at your backyard patio bar can help you picture the finished space. Pick the roofline first. Everything else follows from there.
4. Prep Your Space Before Assembly Day
Surface and Site Requirements
Before any crew shows up, your yard needs one thing above all else: a reasonably level surface. That's non-negotiable. A gently sloped lawn can usually be graded by hand, but anything dramatically uneven should get sorted out first, since a crooked base makes for a crooked bar no matter how good the carpentry is.
If you're picturing your backyard tiki bar sitting on a concrete pad or paver surface, know that's arranged separately, on your end, before the build date. Hardscaping isn't part of the assembly service. Many homeowners pour a simple slab or lay pavers weeks in advance, then schedule delivery once the surface has cured and settled. Skipping that sequence just creates headaches later.
Measuring matters more than people expect. Check clearance for the roofline, especially if there's a soffit, pergola, or tree limb overhead, and think about which side you want the entry facing before the truck arrives. A few feet of miscalculated clearance can force an awkward last-minute redesign, so measure twice and sketch it out if you have to.
Working Around Existing Landscaping
If this bar is one piece of a bigger backyard overhaul, loop in your landscaper early. Coordinating schedules means grading, planting beds, or irrigation lines get planned around the bar's footprint instead of bumping into it after the fact. It's a lot easier to move a shrub on paper than to dig one up twice.
Exposed or windy sites need extra thought, particularly open lots near the coast or on a hill with no windbreak. Expansion bolt anchoring guidance exists for exactly this situation, securing the structure to a concrete or paver base so it isn't shifting during storms. Skip this step on a breezy site and you're asking for trouble. For homeowners weighing broader outdoor comfort upgrades at the same time, some find it useful to review an outside resource on system care program routines, since seasonal maintenance habits for one outdoor investment often translate to another. Keep existing roots and irrigation heads mapped out too, so nothing gets nicked during final leveling.
5. Add Functional Upgrades: Grilling, Sheds, and Winterizing
A bar on its own is great. A bar that handles food, storage, and bad weather is the one your friends actually show up for every weekend.
Grilling Solutions vs. Full Outdoor Kitchens
Full outdoor kitchen construction means built-in appliances, gas lines, counters, and usually a contractor crew for weeks. That's overkill for most backyards. Grilling solutions built around your bar give you the same game-day function — a spot to cook, serve, and hang out — without the permits or the price tag of a built-in kitchen. A shed/bar combo adds to that by solving the storage problem most backyard setups never account for: where do the cushions, the propane tank, the extra chairs actually go?
- Grilling solutions add counter space and layout right next to the bar, so the cook isn't stuck 20 feet away from the party.
- Shed/bar combos pair a storage section with serving space in one footprint, which matters if your yard can't fit two separate structures.
- Winterize panels close off the open sides, stretching usable months into fall and winter in colder states.
- Removable or adjustable panels mean you're not locked in — open it back up the first warm weekend of spring.
- Plumbing, sinks, and kegerator refrigeration hookups aren't part of any of this; those get arranged separately through a licensed plumber or electrician.
Think of it as modular. You pick what the yard and the budget actually need, not what a kitchen showroom wants to sell you.
6. Build vs. Buy: Comparing a Backyard Tiki Bar
Before you commit, weigh what each path actually costs you in weekends, dollars, and headaches. DIY kits and plans give you lumber lists and instructions, but you supply the tools, the muscle, and the free time. Decor-only sets (tiki signs, pop-up huts) look the part online, yet they don't give you real shelter or a counter you can actually serve drinks from. A delivered-and-assembled option skips the build step entirely, with a crew finishing setup in about 90 minutes.
Time
Plans and flat-pack kits usually eat two to four weekends, depending on your skill level and whether the weather cooperates. A decor set takes an afternoon to unbox but leaves you with no working structure. Ninety minutes, start to finish, is hard to beat.
Cost, and Skill Tradeoffs
Here's a rough side-by-side, based on typical project ranges homeowners report for each route.
| Approach | Typical Time | Tools/Skill Needed | Real Shelter & Counter? |
|---|---|---|---|
| Decor-only tiki set | 1 afternoon | None | No |
| DIY kit or plans | 2-4 weekends | Saw, drill, framing experience | Yes, if built correctly |
| Local carpenter build | 1-3 weeks | None (hired out) | Yes |
| Delivered & assembled Tavern-style bar | ~90 minutes | None | Yes |
Upfront price matters, but so does durability five years out. A flat-pack kit built with weekend-level skill can shift or leak if joints aren't tight. That's not a knock on DIYers — it's just reality. Grade #1 pressure treated lumber and a galvanized steel roof hold up with far less guesswork, and skipping the build step is often worth more than the dollars you'd save doing it yourself.
7. Personalize the Look: Paint, Lighting Prep, and Accessories
Painting and Finish Options
Once your structure is up, the fun part starts. Painting packages let you push the look toward tropical (think bamboo tones, deep teal trim, thatch-style accents), coastal (whites, soft blues, weathered grey), or a classic tavern feel with dark stain and black hardware. If you'd rather do it yourself, self-paint guidance covers prep, primer choice, and which exterior paints hold up best on pressure treated lumber. Either route gets you a finish that matches your backyard, not someone else's showroom photo.
Think about your theme before you pick colors. A bright tiki palette next to a muted grey deck can look disjointed. Pull one or two tones from existing fencing, siding, or patio furniture and build outward from there. It's a small detail, but it's the difference between a bar that looks planned and one that looks bolted on.
Stocking the Space with Accessories
A bar without gear is just a roof over a counter. Bartender accessories and essentials cover the serving side: bottle openers, shakers, speed rails, cutting boards, towel hooks, and shelving add-ons sized to fit your model. Stock enough that friends can mix their own drinks without raiding your kitchen every ten minutes.
Keep in mind these are dry bars unless you've separately hired a plumber for a sink or water line. No plumbing comes standard. For draft beer, the Tavern itself just houses a customer-supplied kegerator or cooler unit — sizing and clearance questions are worth running by phone or text support before you order.
Fitting TVs and Low-Headroom Spots
Mounting a big screen or squeezing a Tavern under a low overhang? Entry side placement and roof height are both adjustable at order time. That flexibility solves two common headaches: tight side yards and TVs that need extra clearance up top.
One thing to sort out separately: power. Running wiring for lighting, outlets, or a mounted TV is electrical work, and that means hiring a local licensed electrician. The Tavern's frame is built to accommodate those additions once wiring is in place — it just doesn't include the wiring itself.
8. Where to Put It: Poolside, Deck-Adjacent, or Standalone
Poolside and Deck Placement Tips
Pool and bar belong together. A Dunbar or 7-Up gives you enough counter space for a crowd dripping from the deep end, and the covered roof keeps bottles out of direct sun. Add winterize panels when the pool closes for the season, and the whole structure stays protected instead of sitting exposed through frost and wind. Just keep splash zones in mind — a few feet of buffer saves your lumber finish.
If you've already got a deck or patio, don't rebuild it. Set a Tavern at the edge as the entertaining centerpiece instead, and let the existing surface do its job. Deluxe Collection models with 6x6 posts give you that deck-grade sturdiness without hiring a deck contractor at all. It's the cheat code for upgrading a tired patio.
Open yard space works too, and it's honestly the most flexible option. No deck, no pool, no fixed lines to work around — just pick a level spot. Standalone placement also makes it easier to orient the bar toward wherever your guests naturally gather.
One rule worth repeating: keep real distance from fire pits or open flame features. Pressure-treated wood and roaring flames don't mix, so leave generous clearance and ask a fire feature specialist for exact safety distances before you commit to a spot.
9. Financing, Support, and What Happens on Delivery Day
Money is usually the real decision point, not style or size. A custom build is a real purchase, so it helps to know what's negotiable before you commit.
Financing Options
Most dedicated providers in this space offer financing so you can spread the cost over monthly payments instead of paying the full build price upfront. That matters if you're weighing a backyard bar against other home upgrades competing for the same budget. Before you sign anything, call or text with your sizing and placement questions — reputable outfits staff support lines from 8am to 6pm EST, seven days a week, specifically to help with these calls.
Assembly Day Checklist
Here's roughly what a well-run delivery day looks like, start to finish:
- A crew arrives with the bar pre-built in sections at the workshop, not as a flat-pack kit you assemble yourself.
- On-site assembly typically wraps up in about 90 minutes, provided your surface is level and accessible.
- Someone walks you through height, roof, and entry-side configuration before final anchoring.
- Expansion bolt anchoring gets discussed if your yard is exposed to wind.
- You get a full refund guarantee if the order genuinely can't be fulfilled.
- Reviews matter here — a provider holding a 5.0 Google rating across 60-plus reviews is a decent signal the process actually runs this smoothly.
Skip any seller who can't answer size or placement questions before delivery day. That's not a minor gap — it's the whole job.
Before committing to a backyard bar project, it's worth getting honest about sequencing: site prep, utilities, and any permanent features like fire elements or fencing typically need their own specialists and their own timeline, separate from the bar itself. The real question is what the space needs to feel finished versus what simply needs to show up ready to use once the ground is level and ready. Weighing those two categories first tends to make every other decision — including which structure anchors the space — much easier to sort out.